Friday, November 21, 2008

Grilled Tuna With White Bean Puree, Olive Tapenade, and Roasted Cherry Tomatoes for Tyler Florence Fridays

It's Tyler Florence Friday or TFF time again and our second week of making and posting the recipes of the wonderful Tyler Florence. I stuck with the same cookbook this week: Stirring the Pot because I saw this recipe for tuna (pg 162-163) and really wanted to try it. Although it is a recipe with several components they all looked pretty easy and I thought it would be a great meal to share with a friend.


Grilled Tuna with White Bean Puree, Olive Tapenade, and Roasted Cherry Tomatoes
Stirring The Pot, Tyler Florence
-------

Tyler says: "I love this Mediterranean take on grilled tuna steak. The gorgeous grill marks contrast with the moist, rare flesh of the fish. The creamy white bean puree and the tapenade offer two totally different dimensions to the dish--which I find myself going back and forth between them."

---
1 pint on-the-vine cherry tomatoes
1/2 cup Orange-Chili oil (see recipe below)
---
Olive Tapenade
1 cup pitted kalamata olives
1 small garlic clove, peeled
pinch crushed red pepper flakes
4 sprigs fresh Italian flat-leaf parsley
1 Tbsp fresh tarragon
1 Tbsp red or white vinegar
3 Tbsp extra-virgin olive oil
kosher salt and freshly ground black pepper
---
White Bean Pure
Extra-virgin olive oil
2 garlic cloves peeled and roughly chopped
2 anchovy fillets
2 14-ounce cans white cannellini beans, drained
1/2 cup chicken broth heated
2 Tbsp white wine vinegar
kosher salt and freshly ground black pepper
---

Tuna
2 sushi-quality tuna steaks (such as Ahi), about 1 inch thick (6-8 ounces each)
extra-virgin olive oil
Kosher salt and freshly ground black pepper
Israeli arugula (or regular arugula)
-----

Preheat oven to 375 degrees F. Lay tomatoes in a single layer on a roasting tray. Drizzle with Orange-Chili Oil. Roast tomatoes for 8-10 minutes, until tomatoes burst and give off their juices.

To prepare the tapenade, combine olives, garlic, red pepper flakes, parsley, tarragon, vinegar and oil in a food processor. Pulse until a coarse puree forms. Adjust seasoning with salt and pepper; set aside.
---

For the White Bean Puree, place a saucepan over medium heat and add a 2-count of oil (about 2 Tbsp). Add the garlic and anchovies and cook until the garlic and cook until the garlic is fragrant. Add the drained beans and warm broth; cook until heated through. Transfer the mixture to a clean food processor; add vinegar and puree. (Thin with extra broth if the puree is too thick). Season to taste with salt and pepper. Set aside and keep warm until ready to serve.
---

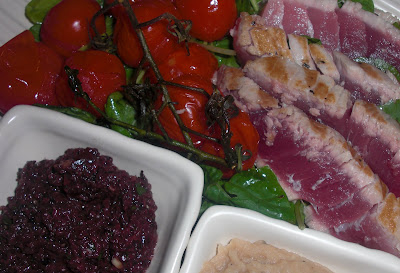
Heat the grill to high. Drizzle the tuna with oil and season with salt and pepper. Place tuna on the hot grill; cook about 45 seconds. turn tuna and cook for another 45 seconds. (The tuna should be rare on the inside and have nice grill marks on the outside). serve tuna with Olive Tapenade, White Bean Puree, arugula, and roasted on-the-vine tomatoes.
---

Orange-Chili Oil: In a bowl combine 4 springs fresh thyme, 2 fresh rosemary sprigs, 1 1/2 Tbsp crushed red pepper flakes, 2 strips orange peel, and 1 1/2 cups extra-virgin olive oil. Set aside for at least 1 hour to let the flavors infuse. Cover and store remaining oil in the refrigerator for 2 to 3 months.


Notes/Results: I invited my friend Natalie over for dinner and served this. It is delicious, the flavors and textures truly compliment each other. The tuna is moist and great with the peppery arugula, the bean puree has a lot of flavor from the anchovy and garlic, the tapenade is tangy and bright, and the tomatoes are juicy and delicious with the orange-chili oil. Nat made the same comment Tyler did about liking going back and forth between the tapenade and the bean puree.

Don't let the long list of ingredients and steps in the recipe bother you as it all comes together quickly and easily. I made the chili oil and tapenade earlier in the day and the beans, tomatoes and tuna before serving. This is a great meal for entertaining as it tastes great and looks incredible on the plate. I would make this again as well as make some of the recipe's components to serve on their own. So far Stirring The Pot is 2 for 2 in my book.
-------

You can check what the other TFF members made and posted at the round up on the TFF site (here), and if you are a Tyler fan (or fanatic) consider joining us next Friday!

Thursday, November 20, 2008

Barefoot Bloggers Bonus Recipes--Mini Orange Chocolate Chunk Cakes and Chive Risotto Cakes

This month there are not one but two bonus recipes to post in addition to our regularly scheduled posts and they are both "cakes". So let the fun begin!


Our first recipe is Mini Orange Chocolate Chunk Cakes, from Barefoot Contessa Parties selected by Lisa from Lime in the Coconut who created our great new Barefoot Bloggers avatar. (See it on the side of the page!) Being able to both cook and design graphics well--I am envious! Lisa picked a recipe that I doubt I ever would have tried with these mini cakes. I have never been a big chocolate-orange combo fan. I always thought that those fall apart chocolate oranges you see at Christmas were cool because of the segments but I never liked to eat them. But this is Barefoot Bloggers, I vowed to make all the recipes and Ina has not let me down yet so I blindly went ahead. I say blindly because it probably would have made my life easier to read the recipe ahead of time and read it again carefully while cooking. I think I just kind of glanced at it quickly. Actually reading it would have meant that I had all the ingredients, like say buttermilk. Luckily, you can make your own with milk and lemon juice. It also would have made me notice I needed to make syrup and brush the warm cakes with it before I had to go back and do the process. Regardless of my disarray and discombobulation on this one, this is a very forgiving recipe and my cakes turned out pretty well.


Mini Orange Chocolate Chunk Cakes
Ina Garten, Barefoot Contessa Parties
-----
1/4 pound unsalted butter at room temperature
1 cup sugar
2 extra-large eggs at room temperature
1/8 cup grated orange zest (2 large oranges)
1 1/2 cups all-purpose flour plus 1 tablespoon
1/4 teaspoon baking powder
1/4 teaspoon baking soda
1/4 teaspoon kosher salt
1/4 cup freshly squeezed orange juice
3 ounces buttermilk at room temperature
1 teaspoon pure vanilla extract
1 cup good semisweet chocolate chunks
For the syrup:
1/4 cup sugar
1/4 cup freshly squeezed orange juice

For the ganache4 ounces good semisweet chocolate chips
1/4 cup heavy cream
1/2 teaspoon instant coffee granules

Directions: Preheat the oven to 350 degrees F. Grease and flour 6 individual serving baking molds, such as the flexible non stick 100 percent silicone molds. Cream the butter and sugar in the bowl of an electric mixer fitted with the paddle attachment for about 5 minutes, or until light and fluffy. Add the eggs, 1 at a time, then the orange zest. Sift together 1 1/2 cups flour, the baking powder, baking soda, and salt in a large bowl. In another bowl, combine the orange juice, buttermilk, and vanilla. Add the flour and buttermilk mixtures alternately in thirds to the creamed butter, beginning and ending with the flour. Toss the chocolate chunks with 1 tablespoon flour and add to the batter. Pour into the pans, smooth the tops, and bake for 30 minutes, until a cake tester comes out clean. Let the cakes cool in the molds on a wire rack for 10 minutes.

Meanwhile, make the syrup. In a small saucepan over medium-low heat, cook the sugar with the orange juice until the sugar dissolves. Remove the cake from the pans, put them on a rack over a tray, and spoon the orange syrup over the cakes. Allow the cakes to cool completely.
For the ganache, melt the chocolate, heavy cream, and coffee in the top of a double boiler over simmering water until smooth and warm, stirring occasionally. Drizzle over the top of the cakes.


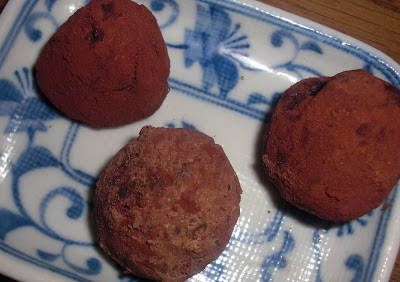
Notes/Results: Not having mini pans (and NOT being a baker so why go buy them?), I decided to make these into cupcakes (Thanks to Anne Strawberry who mentioned the idea on musings). Cupcakes always taste better than a big cake to me and are easier to give away. I also decided to swirl the cupcake tops into the ganache rather than drizzle it--easier. These are really good. I guess I thought it was chocolate cake (again a reason to READ the recipe) but the orange cake studded with the chocolate chips was delicious. I had a lot of ganache so I did what anyone with extra ganache should--made truffles. Some with a green tea cocoa powder mixture and some with a curry cocoa powder mixture too. Yum!

I gave the cupcakes out to some co-workers who really liked them. Thanks Lisa for a great pick and a wonderful avatar!


Our next recipe pick is from...Me! Although not talented in design like Lisa, apparently I had the most links to the Barefoot Bloggers site from my blog this month. I feel a bit guilty because I just picked a recipe last month, but not guilty enough not to pick the first recipe I marked as soon as I bought Ina's new book, Barefoot Contessa Back to Basics, Chive-Risotto Cakes. They looked like a small slice of heaven although how they ended up in the vegetables section of the cookbook is interesting. (Are chives Ina's vegetable like mint is Paula Deans?)

Chive-Risotto Cakes
Back to Basics, Ina Garten
-----
Ina says: " I used to have to wait until I made risotto in order to make risotto cakes from the leftovers. So I decided to do a recipe for risotto cakes that I make from scratch. Most of this can be assembled early in the day and then sauteed just before dinner. The yogurt, chives, and Italian Fontina give these a delicious creamy interior, and the panko gives them a wonderful crunchy crust."

Kosher salt
1 cup uncooked Arborio rice
½ cup Greek yogurt
2 extra-large eggs
3 tablespoons minced fresh chives
1 ½ cup cups grated Italian Fontina cheese (5 ounces)
½ teaspoon freshly ground black pepper
¾ cup panko (Japanese dried bread flakes)
Good olive oil

Bring a large (4 quart) pot of water to a boil and add ½ tablespoon salt and the Arborio rice. Cook, stirring occasionally, for 20 minutes. The grains of rice will be quite soft. Drain the rice in a sieve and run under cold water until cool. Drain well. Meanwhile, whisk together the yogurt, eggs, chives, Fontina, 1 ¼ teaspoons salt, and the pepper in a medium bowl. Add the cooled rice and mix well. Cover with plastic wrap and refrigerate for 2 hours or overnight, until firm.


When ready to cook, preheat the oven to 250 degrees. Spread the panko in a shallow dish. Heat 3 tablespoons olive oil in a large skillet over medium-low heat. Form balls of the rice mixture using a standard (2 1/4 –inch) ice cream scoop or a large spoon. Pat the balls into patties 3 inches in diameter and ¾ inch thick. Place 4-6 patties in the panko, turning once to coat. Place the patties in the hot oil and cook, turning once, for about 3 minutes on each side until the risotto cakes are crisp and nicely browned. Place on a sheet pan lined with parchment paper and keep warm in the oven for up to 30 minutes. Continue cooking in batches, adding oil as necessary, until all the cakes are fried. Serve hot.


Notes/Results: I guess some of the BBs had trouble with these cakes staying together but I got lucky after my first two "test cakes" and the rest came together nicely. I mixed it up the night before and fried them the next day which may have helped. Also Natashya mentioned she used a higher heat and plenty of oil and I did the same. A long flexible spatula and making them 3-4 at a time also helped. These are REALLY good. The taste, the texture--very decadent. I served them simply, on top of a salad of local greens and a little bit of asparagus with lemon, olive oil, salt and pepper. Lots leftovers (I got 14 out of it) for lunch and I reheated and fed them to a friend with dinner and they were still tasty. It would be fun to experiment with different cheeses in these.


Once more two great Ina recipes. These are optional so not all Barefoot Bloggers may do one or both of them but you can check out the ones that did here. You can join us there too and maybe I'll get to pick another recipe! ;-)
-----
BTW--If you are also a Tyler Florence fan(atic):
Don't forget to join us for Tyler Florence Fridays.
Get the details at the TFF site here!

Wednesday, November 19, 2008

Blog Party# 40--Holiday Edition 2.0 : Cured Salmon, Mini Cheeseballs and Guava Bellinis


It's Blog Party time again, that wonderful virtual party hosted by Stephanie at Dispensing Happiness. This months theme for pupus and drinks is glitz, glam and decadent indulgence, time to ring in the busy holiday season. As much fun as glitzy events at the holidays are, we all are so busy and have so little time and I wanted some appetizers that were elegant but still quick and easy, and a sparkling drink with some indulgent champagne.

For the appetizers, I turned to the wonderfully elegant Jacques Pepin and what is becoming a favorite cookbook; More Fast Food My Way. I used to be intimidated by his recipes, but this cookbook has simple, quick recipes and a whole "Minute Recipes" section for appetizers. Because they are easy, I chose two: Cured Salmon Morsels (a quick gravlax style bite) and Cheese Balls with Pignoli Nuts (mini fruity cheese balls).

Cured Salmon Morsels
More Fast Food My Way, Jaques Pepin

Jaques says: "Gravlax is one of my favorite hors d' oeuvres, and I usually present it on buttered bread or cucumber slices. One day when I was slicing salmon, I decided to cut some of it into small cubes, quickly cure them, and serve them on toothpicks. these take only a minute to prepare. The fresher the salmon, the more outstanding the finished morsels."

Cut about 8 ounces cleaned salmon into 1" cubes. Sprinkle with about 3/4 tsp salt, 1/2 tsp sugar, and 1/2 tsp freshly ground pepper. Toss the cubes together in a small bowl and let cure for about 10 minutes. Meanwhile, finely chop some fresh herbs (chives, tarragon and parsley). Toss the salmon pieces with the herbs to coat them well and arrange them on a serving plate. Stick a toothpick in each cube. Sprinkle with the best extra-virgin olive oil and serve. (Makes about 30 pieces)


Cheeseballs With Pignoli Nuts
More Fast Food My Way, Jacques Pepin

Jacques says: "I love cheese and always buy more than I consume. Through the years, I have worked out a number of recipes to use leftover cheese, so I don't have to feel guilty about it spoiling. This appetizer is best done with soft cheeses, like fontina, Camembert, blue, St. Albray or Reblochon. Pear and cranberries lend a little sweetness and the toasted pignoli nuts add richness and texture--a perfect combination."

Spread about 3/4 cup pignoli nuts on a baking sheet. Bake in a 400-degree oven for 6 to 8 minutes, or until lightly browned. Set aside to cool. Remove any skin or mold from enough soft cheese (one variety or a mixture of those listed above or others), to yield 1 cup. Break into 1-inch pieces. Put the cheese in the food processor with 1/2 cup 1-inch pieces of peeled pair or apple, 2 Tbsp dried cranberries, and 1/4 tsp each salt and freshly ground black pepper. Process until the mixture is still chunky but well combined and is beginning to stick together. divide into 18 small portions of about 2 tsps each. Shape into small balls. Roll in toasted pignoli nuts to coat. Refrigerate until serving time. (Make 18 small cheese balls)


Notes/Results: Again quick, easy and elegant enough for a special holiday party. The flavor of the salmon gravlax with the herbs and olive oil is delicious. For a touch more glamour, instead of spearing the salmon with toothpicks, I chopped it smaller and did it in little ceramic spoons, lined up on plates. The cheeseballs were a nice mix of savory and sweet, with a nice crunch from the pignoli. The salmon was my favorite but I would make both again.


For the cocktail, I went to my new Champagne Cocktails book, won at Stephanie's Birthday bash in September (Thanks Stephanie!) and selected a classic bellini. Originally made with sparkling wine or champagne and peach puree, I decided to add some local flavor by selecting a Guava Bellini as I happened to make some fresh guava puree the other day guava. Refreshing, indulgent and slightly tropical.

Guava Bellini
4 ounces prosecco, sparkling wine or champagne
1 ounce guava puree
-----
In a cocktail shaker combine the sparkling wine with the guava puree over ice. stir until mixed and strain into a chilled champagne flute.


Time to dust off that party frock and get out the tiara and jewels and head to the party. Check out the fun here, after Saturday. Thanks Stephanie for another fabulous, fun event! Happy Holidays!

Monday, November 17, 2008

Local Asparagus with Panko, Pinenuts & Capers


Although it isn't Asparagus season in most places, a little stand at the Farmer's Market was carrying it last weekend. To be honest I didn't know they grew asparagus in the islands but it looked good (although a bit thinner than regular asparagus), so I bought a bunch.


The other night at a wine tasting/pairing (I swear I will write about them some day), I had a piece of seared ahi with a topping of bread crumbs pine nuts, capers and a few other ingredients. While I plan to recreate it over fish sometime, I also thought that a similar blend of ingredients would be a fun and delicious way to top asparagus.

-----
Asparagus with Panko, Pine Nuts and Capers
---
1 bunch asparagus, rinsed and trimmed
2 Tbsp pine nuts
olive oil
1/3 cup panko breadcrumbs
1 Tbsp capers
zest of 1 lemon
black pepper
juice from 1 lemon
salt
---
Lightly steam asparagus in your preferred method (I do mine in the microwave steamer). Meanwhile toast pine nuts in a small pan over medium heat, tossing frequently until lightly browned. Remove pine nuts from pan and set aside. Put olive oil in pan and stir in panko and capers, lemon juice and peppers, cooking over medium heat until panko is lightly brown and crunchy. Place asparagus in serving dish, squeeze lightly with lemon and salt lightly. Spread panko mixture over asparagus and serve.


Results: Delicious! The slightly crunchy crumbs and pine nuts really add a lot to the asparagus without the heavy feeling you get from a sauce. The lemon and capers also compliment it very nicely. A simple, quick recipe that I would make again as well as use on beans, or other vegetables.

Sunday, November 16, 2008

Beef Stew with Cumin for "Souper Sundays"


Once again, it's "Souper Sundays" and time for a bowl of something warm and satisfying. I have been craving beef stew for some reason this week, the ultimate hearty, comfort food. For my stew, I decided to combine two favorites, a basic beef stew like my Mom makes combined with some cumin and black pepper. Once in Japan, I stopped for lunch at a favorite restaurant and they had a beef stew with black pepper and cumin that was warming and delicious and I wanted to recreate those flavors.

Beef Stew with Cumin
-----
2 1/2 lb beef stew meat cut into 1" cubes
4 Tbsp flour
salt
pepper
2 Tbsp olive oil
1 onion, chopped
2 garlic cloves, minced
2 1/2 Tbsp ground cumin
5 cups beef broth
3 medium potatoes, peeled and diced
3/4 cup diced carrot
3/4 cup diced parsnip
2 fennel bulbs, stems, removed, cut
1/3 cup daikon
1/2 cup frozen green peas
-----
In a Ziploc bag, add the flour and 1 tsp each salt and pepper. Add meat cubes a few at a time, shaking lightly to coat. In a large heavy pot or dutch oven, heat oil and brown meat, one half at a time. Return all meat to pan, add onion, garlic, cumin, 1 Tbsp salt and 1 Tbsp black pepper. Add broth and bring to a boil. Reduce heat, cover and simmer about 1 hour until meat is almost tender. Add all vegetables, except peas and cover, simmering until vegetables are tender, about 30 minutes. Add peas at end and heat through. Add additional salt and pepper to taste.
Notes/Results: Potato, carrots and peas are pretty standard stew veggies. I saw some parsnips and thought they would be fun to add since they are slightly stronger and sweeter than the carrots. I had some fennel in my CSA box so added that too, as well as a bit of leftover daikon radish. I wanted my stew a bit thicker, so I also added some cornstarch (about 2 Tbsp in 1/2 cup warm water). You have to love how good a pot of stew bubbling makes the kitchen smell! I liked the flavor combination of the stew and how well the earthy sweetness of the cumin compliments the beef and the black pepper. Although the veggies are a little different than the average stew, I liked the different flavors and textures that each one brought. I would make this again. I served it on its own, as it is a meal in a bowl, although some nice crusty bread would go well with it.

It is busy in the Souper Sunday Kitchen today as we have several friends stopping by with some great looking soups and such a variety of recipes too. Good soup and good friends--what could be better!


Popping by this week is my favorite Souper Sunday regular and friend, Natashya from Living in the Kitchen with Puppies with a great vegan option; Chickpea Noodle Soup or as she calls it "a little solace in a bowl". This soup looks so healthy and filling. Check out the great dish and spoon--love the blue.


A big welcome to Christine from Kits Chow who dropped by from Vancouver BC with a delicious looking bowl of Oyster and Century Egg Congee. I have had congee before, but not one with oysters or one that looked this good! I have also enjoyed looking at her blog the last few days and seeing the great food she makes. Thanks for coming Christine!


Another big Aloha to Suzie from Munch & Nibble. Even though it is on its way to being full-on summer down under, Suzie is joining us from Sydney, Australia for soup and is bringing a cold and refreshing Andalusian Gazpacho. Since it is so warm here today, a big bowl of this thick, cool, tomato-ey goodness sounds wonderful. Thanks for joining us Suzie!

Thanks to Natashya, Christine and Suzie for joining Souper Sundays this week. Take a few minutes and visit their blogs to see more about their souper creations. If you have a soup, stew, chili, or any other soup-like dish that you eat with a spoon that you want to share, drop by and join us. You don't have to make your creation on Sunday, just send me an email or shoot me a comment and I'll include you in the round-up. Happy Sunday Everyone!

Friday, November 14, 2008

Brussels Sprouts Salad with Pancetta and Cranberries for (The Newly Launched) Tyler Florence Fridays


It's TFF today! That stands for Tyler Florence Fridays, a new weekly event hosted by my friends Natashya of Living in the Kitchen With Puppies and Megan of My Baking Adventures and me! Because Tyler is such a laid back chef and the three of us are that way too, we decided to create an easy going event where you get to pick a Tyler Florence recipe from one of his books, The Food Network, a magazine etc. (yes YOU get to choose what you make each week, how great is that!?!) Then you simply post about it--what you liked, any changes, etc. We round em up each Friday on the newly created TFF website. You can get all the details at the TFF site: here.
-----
So it's the first post and what did I decide to make? Why Brussels Sprouts of course! Yeah, I know what you are thinking..."Brussels sprouts? You have 5 Tyler cookbooks and hundreds of recipes to choose from and you picked Brussels sprouts?!? Do you even like Brussels sprouts?! "Yeah, not really. I don't hate them but they always seem to be hard, slightly bitter and not a favorite vegetable for me. I periodically try them with garlic, butter, bacon, even pancetta and still, not a fan. Flipping through one of Tyler's newest books, Stirring the Pot, his recipe for Brussels Sprouts Salad with Pancetta and Cranberries caught my eye. The caption on the page states: "I think even your kids will eat this one!" (Mighty bold words Tyler!) The recipe looked easy, the pancetta called me like a siren, I have a huge bag of dried cranberries in my freezer and the idea of separating the leaves of the Brussels sprouts seemed like a great idea so my choice was made.

Brussels Sprouts Salad with Pancetta and Cranberries
Stirring the Pot, Tyler Florence
serves 4-6 / time: 30 minutes
-----
2 lbs baby Brussels sprouts
extra-virgin olive oil
6 ounces pancetta, cut into small dice (1 1/2 cups)
1/4 cup dried cranberries
3 Tbsp shallots, finely chopped
1 garlic clove, peeled and minced
2 Tbsp balsamic vinegar
1/4 cup chicken broth
Kosher salt and freshly ground black pepper
-----
Pick all of the Brussels sprouts apart so you have one big pile of leaves. In a large saute pan, heat heat a 2-count of olive oil (about 2 Tbsp) over medium heat. Add the pancetta and cook for 2-3 minutes, until the fat renders and the pancetta is crispy.
Add the separated Brussels sprouts leaves, cranberries, shallots, and garlic. Toss well to combine all the ingredients. Add the balsamic vinegar and chicken broth and continue to cook for 3-4 minutes, until the Brussels sprouts leaves have just wilted. Season to taste with salt and pepper. Serve warm.

Notes/Results: I made this recipe as written, but did make a smaller quantity. I was happy to find some nice-looking Brussels sprouts at Whole Foods but disappointed that they were out of pancetta in their meat case. My visions of thick, diced pancetta out the window, I had to settle for the thin-sliced packaged stuff (I guess I better add a bit extra). They recipe went together easily, the most time being spent on separating the leaves of the Brussels sprouts. Even that was easy, after slicing off the stem ends and it was somewhat therapeutic peeling off the leaves. The results: excellent! The crispy, salty pancetta combined with the sweet tang of the cranberries and the balsamic vinegar was delicious. Separating the leaves solved the issue I have with the hard, little sprouts. This would be great for a holiday dinner but easy enough for a simple weeknight side dish. Since there are no kids at my house, (only a cat who's appreciation of Brussels sprouts is limited to batting them around if one falls on the floor) I couldn't test Tyler's claim, but they passed my test. What did I serve them with? Nothing! After a late lunch, a bowl of this salad was all I needed for dinner. I will make these again.
-----
BTW--If you don't have any/many Tyler books and are looking to start collecting, the two new softcover cookbooks; Stirring the Pot and Dinner at My Place are a great way to start. Full of Tyler's tips and great sounding recipes (I have next week's picked out already), they are also a reasonable price. Even Max thinks they are a great read! (Such a poser!)

A big mahalo (thank you) to Natashya for getting Tyler Florence Fridays off and running. She took our back and forth conversations about starting a Tyler group and whipped out a website and process in record time. I am looking forward to seeing what recipes everyone picked and hearing how they liked them. I hope you join us.
Happy TFF everyone!

Thursday, November 13, 2008

Herb-Roasted Onions--Barefoot Bloggers

This month's first recipe is Herb-Roasted Onions, selected by Kelly of Baking With the Boys. I was glad to see her pick this recipe because I probably would not have thought to try it myself and we can all use great new ideas for side dishes.

You can find the recipe on the Food Network here as well as The Barefoot Contessa at Home, page 156.


Herb-Roasted Onions
Barefoot Contessa At Home, Ina Garten

2 red onions
1 yellow onion
2 tablespoons freshly squeezed lemon juice
1 teaspoon Dijon mustard
1 teaspoon minced garlic
1/2 tablespoon minced fresh thyme leaves
3/4 teaspoon kosher salt
1/4 teaspoon freshly ground black pepper
1/4 cup good olive oil
1/2 tablespoon minced fresh parsley leaves

Preheat the oven to 400 degrees F. Remove the stem end of each onion and carefully slice off the brown part of the root end, leaving the root intact. Peel the onion. Stand each onion root end up on a cutting board and cut the onion in wedges through the root. Place the wedges in a bowl.

For the dressing, combine the lemon juice, mustard, garlic, thyme, salt, and pepper in a large bowl. Slowly whisk in the olive oil. Pour the dressing over the onions and toss well. With a slotted spoon, transfer the onions to a sheet pan, reserving the vinaigrette that remains in the bowl. Bake the onions for 30 to 45 minutes, until tender and browned. Toss the onions once during cooking. Remove from the oven, and drizzle with the reserved dressing. Sprinkle with parsley, season to taste and serve warm or at room temperature.


I liked these onions, they are flavorful, quick and easy to make. The roasting mellows the flavor and I loved the thyme, lemon and mustard flavors in the dressing. I used a grainy Dijon mustard and liked that texture in there too. I realized I forgot to buy the fresh thyme so I ended up using dried, but the flavor was still there. I also might have gotten "chop happy" with the ends of my onions as most of my wedges came apart. Actually, my favorite part of the dish were the pieces that fell off and got all crispy and really brown. Although I ended up eating this dish with fish and salsa, if I made it again I would serve it with steak.


Thanks Kelly for another great Barefoot Bloggers pick. Check out the other BB's results here and join us next week where there are two optional recipes that can be posted--Mini Orange Chocolate Chunk Cakes picked by Lisa from Lime in the Coconut for designing our great new Barefoot Bloggers avatar (above) and Chive-Risotto Cakes picked by yours truly for referring the most people to the Barefoot Bloggers site (Who would have guessed? Lucky me!) Thinking of joining us for Barefoot Bloggers? Check it out here.

If you love spending time with Ina on Thursdays
and want to hang out with Tyler Florence on Fridays,
join us for TFF--Tyler Florence Fridays.
You pick your favorite Tyler recipes to cook and post each week--starting this week.
Get the details at the new TFF site here.