Saturday, June 19, 2010

Maté Y Caña--An Herb Tea Cocktail and a Simple Saturday Sipper

I found a fun used cookbook a few months back, "A Matter of Taste: The Definitive Seasoning Cookbook" by Sylvia Windle Humphrey. Published in 1965, in addition to recipes, the book gives the history and use of different herbs, spices and seasonings, making it a charming and useful little reference book to have. While thumbing through it the other day I found a drink recipe that sounded interesting and perfect for this week's Simple Saturday Sipper--the Maté Y Caña a drink from a restaurant called the La Fonda del Sol in New York.


The drink uses maté, a South American infused drink made from yerba maté, a small shrub from the holly family. It is supposed to have health benefits such as boosting immunity, cleansing and detoxify the blood, combating fatigue, stimulating the mind, controlling appetite, reducing stress, and eliminating insomnia. Since I had some maté and rum and coincidentally one of my neighbors just gave me some homemade pineapple liqueur that her cousin made, I was all set to make it.


The book says, "This innocent-seeming drink is extremely intoxicating. The herb tea is a very strong stimulant as well as a smooth blender."

Maté Y Caña from La Fonda del Sol, NYC
"A Matter of Taste" by Sylvia Windle Humphrey
(quantities make 1 drink)

4 ounces tea made from toasted Brazilian maté
1 1/2 ounces white rum
1/2 ounce pineapple liqueur
wedge or juice of lime

Combine all ingredients with ice in a tall glass. Stir well.


Notes/Results: Refreshing and good--I liked the combination of the tea, rum and pineapple liqueur--even better with the squeeze of lime. It is not too sweet, works well as a warm weather drink, and would be easy to make up in a pitcher for a gathering. I really enjoyed the homemade pineapple liqueur (I am lucky my neighbor doesn't drink and passed it on to me) ;-) and I plan on making some of my own soon as there seems to be a lot of easy recipes on line. This was a fun and unique cocktail that I will make again.

(BTW--I looked up the restaurant La Fonda del Sol, to see if it was still there and found out that the original was a huge showplace and theme restaurant that was open from 1960 to the early 1970s. The restaurant was recently revived and re-opened in 2009. Sadly the Maté Y Caña does not seem to have made the new menu!)

Happy Saturday!

Friday, June 18, 2010

Mark Bittman's Swedish / Danish Meatballs Lightened-Up and Dairy-Free

"Dining with Dad" is the theme this week at I Heart Cooking Clubs and looking for a Mark Bittman dish inspired by my dad, I chose the Swedish Kottbullar or Danish Frikadeller (Meatballs) from "The Best Recipes In the World: More Than 1,000 International Recipes To Cook At Home."


My dad was half Swedish and half Danish. "Swedish Meatballs" were a favorite dish of his, and my mom used to make his mother's meatball recipe for him. I decided to keep the traditional cream sauce (optional in Bittman's recipe), but lighten up the dish a bit to reduce some of the fat and calories, and make it dairy-free to make it fit better into my eating preferences. I did that by using almond milk in place of the cream and milk, and using a slurry of brown rice flour and milk (in this case almond milk), a little trick I learned a while back for making lower fat white and cheese sauces. The brown rice milk dissolves easily into cold milk and when heated, thickens the sauce nicely. My changes are in red on the recipe below.


Bittman says, "In general, these are milder than Italian-style meatballs, with cooked onion and no garlic or cheese. Often served with a cream sauce (and lingonberries), they can be made without one, skewered on toothpicks, and passed at parties. A combination of pork, veal, and beef is best here, but if I had to choose only one meat it would unquestionably be pork."

Swedish Kottbullar or Danish Frikadeller (Meatballs)
"The Best Recipes In the World" by Mark Bittman
(Makes 12 or more servings)
Time: 45 minutes

1/2 cup bread or cracker crumbs
1 cup cream or half-and-half, 2/3 cup optional (replaced with unsweetened almond milk and used 1 1/2 cups total)
4 tablespoons (1/2 stick) butter, 1 tablespoon optional (omitted butter & used olive oil)
1 medium onion, minced
salt and black pepper to taste
1/2 pound each ground pork, veal, & beef, or 1-1/2 pounds ground pork (I used pork & veal)
pinch of ground cloves or allspice or 1/2 teaspoon ground ginger (I used a pinch each of ground cloves, allspice and 1 tsp ground ginger)
2 tablespoons flour, optional (used brown rice flour)
3/4 cup beef or chicken stock, preferably homemade or water, optional

Soak the bread or cracker crumbs in 1/3 cup of the cream. (I used almond milk.) Put 1 tablespoon of the butter in a large skillet over medium-high heat. Add the onion and a bit of salt and pepper and cook, stirring occasionally, until the onion softens, about 5 minutes. Turn off the heat.

Combine the bread crumbs, onion, meat, and spice, along with some more salt and pepper; do not overmix or overhandle. With wet hands or wet spoons, shape the meat into small meatballs (I would say as small as you have the patience for, but no more than an inch in diameter).

Put 2 tablespoons of the remaining butter in the skillet and turn the heat to medium-high. When the butter melts, begin adding the meatballs, a few at a time; you may have to cook in batches. Brown nicely on all sides and turn off the heat. Serve immediately or proceed to the next step.

Bittman's sauce: To make a sauce, remove all but a trace of fat from the pan. Return the pan to the stove over medium heat and add the remaining butter and, after it melts, the flour. Stirring constantly, add the stock and cook until slightly thickened. Add the remaining cream and continue to cook for a few more minutes or until thickened. Taste and adjust the seasoning, then pour the meatballs into the sauce to reheat before serving.

For my dairy-free sauce: Remove most of the fat from the meatballs from the pan. Add stock and stir, scraping the "brown bits" off the bottom of the pan. Heat stock over medium heat until it is hot. Meanwhile put brown rice flour in a small bowl and slowly whisk in enough almond milk to form a paste. Then add the remaining almond milk, whisking as you do, making sure that no lumps remain. Add flour-milk mixture to the stock and simmer, stirring frequently until the mixture begins to thicken and is warmed through. Add salt, pepper and allspice to taste, pour meatballs into sauce to reheat before serving.


Notes/Results: Really good--the meatballs were tender and juicy with good flavor and the sauce still rich and creamy without all the butter and cream. I ended up with a mix of ground pork and veal for the meatballs, and I did add more spice than was called for to the meatballs--which I would recommend as they are mild. I also used some allspice in the sauce for an extra touch of flavor--and extra black pepper--I think I got my love for it from my dad! I usually bake my meatballs, but in this case I cooked them in the pan so that I would have some pan drippings for the sauce. I replaced the butter with olive oil, and as mentioned above used almond milk for the cream, making this a dairy-free dish. Served with a simple green salad and with the meatballs and sauce on top of fresh pasta tossed with a bit of olive and parsley, it was a rich and hearty dinner--just a bit more figure and heart friendly than the original. ;-) I am sure my dad would have preferred my grandmother's recipe, but this is a still a good one that I would make again.


You can check out what the other IHCC participants chose to make for Dining with Dad by going to the post here and following the links.

My dad is no longer with us, having passed away almost 16 years ago. I miss him very much, but I have lots of great memories to treasure. This is my dad in his 20's--about 20 years before I was born. I think this picture, in his Navy uniform is fun. ;-)


Happy Aloha Friday and Happy Father's Day Weekend to all the dads out there.

Thursday, June 17, 2010

Caesar Salad and Flank Steak Burgers with Garlic Crostini for the Blogger Burger Club

After several posts of vegetarian and fish dishes, it seems high time to bring in some beef--and in what better form than a burger?! Especially when that burger is a delectable Caesar Salad and Flank Steak Burgers with Garlic Crostini, this month's pick for the Blogger Burger Club. Started by my friend Reeni of Cinnamon Spice & Everything Nice, a couple of months ago, I had been meaning to join in the burger making and rating event. When this month's host turned out to be my friend Kim from Stirring the Pot, and then she picked a burger featuring Caesar salad as a key ingredient, I knew it was time to take action.


This burger is made from ground flank steak--new for me as I usually use grass-fed beef or bison for my burgers. It is served on a thick garlic toast or crostini and topped with Caesar salad and freshly grated or shaved Parmesan cheese. The only change I made to the recipe was to use a bakery loaf of Artisan Asiago Cheese Bread in place of the sourdough.


Caesar Salad and Flank Steak Burgers with Garlic Crostini
Adapted from "Build a Better Burger"
(Makes 4 large meal-sized burgers)
Estimated Time: 30-40 minutes

Dressing:
2 tablespoons olive oil
1 tablespoon extra virgin olive oil
1-1/2 teaspoons red wine vinegar
3/4 teaspoon balsamic vinegar
1/8 teaspoon kosher salt
2 flat anchovy fillets packed in oil, drained and chopped
2 garlic cloves, chopped
2 teaspoons freshly squeezed lemon juice
1/4 teaspoon chopped fresh flat-leaf parsley

Patties:
1-1/2 pounds ground flank steak
1/2 cup chopped fresh flat-leaf parsley
2 shallots, minced
3 garlic cloves, minced
3 tablespoons Zinfandel (or other red wine or beef broth)
1 teaspoon kosher salt
1/2 teaspoon lemon pepper seasoning
1/2 teaspoon freshly ground black pepper
Olive oil, for brushing the grill rack

Garlic Crostini:
8 (1/2 inch-thick) sourdough bread slices
Extra virgin olive oil, for brushing on the bread
4 garlic cloves, peeled and halved

You will also need:
1-1/2 cups washed, dried, and shredded romaine lettuce
Shredded, freshly grated or shaved Parmesan cheese to taste

Prepare a medium-hot fire in a charcoal grill with a cover, or preheat a gas grill to medium high.

To make the dressing, combine the olive oils, vinegars, and salt in a small jar with a lid and shake until well blended. Mash the anchovy fillets and garlic together on a cutting board until they form a paste; transfer to a bowl. Add the oil and vinegar mixture, lemon juice, and parsley and whisk until smooth. Set aside.

To make the patties, combine the steak, parsley, shallots, garlic, Zinfandel, salt, lemon pepper seasoning, and pepper in a large bowl. Handling the meat as little as possible to avoid compacting it, mix well. Divide the mixture into 4 equal portions and form the portions into patties to fit the bread slices.

When the grill is ready, brush the grill rack with olive oil. Place the patties on the rack, cover, and cook, turning once, until done to preference 5-7 minutes on each side for medium. During the last few minutes of cooking, to make the crostini, brush the bread slices to taste with olive oil on both sides. Place the bread slices on the outer edges of the rack, turning once to toast lightly. Remove and rub each side of the toast with 1/2 garlic clove.

To assemble the burgers, combine the lettuce and the dressing in a large bowl and toss lightly. On 4 of the bread slices, place an equal portion of the salad, a patty and a generous sprinkling of Parmesan cheese. Top with the remaining slices and serve.


Notes/Results: Yum! This is an excellent burger--very juicy and a ton of flavor. Have plenty of napkins and maybe a set of silverware at the ready when enjoying it. I liked the tenderness of the ground flank, although for the cost here to buy it and have it ground, I will probably stick to my favorite ground bison because the ground flank was almost twice the price at Whole Foods. (The only (nearby) store willing and able to grind it for me.) The cost did make the burger a bit of an indulgence--but it was worth it. The bread was really good--I wanted it to be on the softer side when it was toasted and it was--plus the asiago cheese flavor was a nice extra. The salad had a nice garlicky level in the dressing and it and the Parmesan, grated on my microplane for maximum volume and "fluff" made the burger extra-special.

This was one of the best burgers I have made lately, so I am going to give it a rating of 3 1/2 stars. (Out of 4 possible stars.) It is something I will likely make again. For the Blogger Burger Club event Kim will be averaging out the ratings and rounding up the burgers after the 20th on her site (here), so go by and check it out.


Thanks to Kim for hosting this month (and for picking such a great burger!) and to Reeni for coming up with this fun event.

BTW: If you are as crazy for Caesar salads as I am, another wonderful salad-inspired sandwich is this BLT with Caesar Mayo that I made last year. Making this burger got me craving these delicious sandwiches again! ;-)

Tuesday, June 15, 2010

Quinoa Croquettes with Cilantro Yogurt Sauce (or The Sodium Saga--Can This Recipe Be Saved?!)

Having some leftover cooked mixed red and regular quinoa, I saw this recipe for Quinoa Croquettes with Cilantro Sauce in June's Natural Solutions magazine and thought it sounded like a good healthy recipe to try. When I went to make the sauce, which "rests" in the fridge before serving, I happened to glance down at the nutrition info at the bottom and noticed the sodium number and then nearly had a heart attack. Although no exact serving amount is given other than "Serves 6" the sodium was listed at 1483 mg per serving! When you consider that the recommended sodium for the average person per day is no more than 2300 mg, one serving of this dish was well over half that amount. A closer look at the sauce recipe revealed the culprits--one I was aware of and planning on cutting down anyway--soy sauce, which even in it's low sodium form is about 700 mg per tablespoon. The second culprit and a bit of a surprise to me was the ume plum vinegar that I had purchased for another recipe and never looked at the label. This condiment comes in at 1050 mg of sodium per teaspoon! Holy salt lick people! With a 1/4 cup of each in the sauce it was enough to make what should be a healthy, vegetarian dish a cardiologist's nightmare. Could this recipe be saved?


I don't know about you but if I am going to indulge in a dish that gives me that much of a sodium wallop, it isn't going to be quinoa cakes. (It will most likely include large amounts of sausage or bacon.) ;-) I decided to change it up and bring the sodium way down. I started by reducing the bad and just putting in 1 tablespoon of soy sauce and 2 teaspoons of the ume vinegar. Next, to keep some of the flavor complexity and the sweet/sour taste the ume brings to the party, I added garlic, the juice of 1 lime and some mirin, or rice wine vinegar. Since I didn't make the original recipe, I can't tell you whether my revised dressing is as good as the original but it tasted great to me and at about 397 mg of sodium per serving (I just added up my sauce numbers, added in the teaspoon of sea salt I put in the quinoa croquettes and divided by 12 since the recipe says it makes double the sauce for the servings), I was able to come in at about 27% of the sodium in the original recipe. Mission accomplished! Moral of the story--if the recipe has nutritional counts, read them and especially read the labels of your condiments so you don't have any hidden surprises. I'll use up my ume vinegar but it will be a teaspoon at a time. ;-)


Quinoa Croquettes with Cilantro Yogurt Sauce
Adapted From "Easy Green Organic" by Anna Getty via Natural Solutions, June 2010
(Serves 6)

Cilantro Yogurt Sauce:
1 large bunch cilantro, stemmed
1/4 cup low-sodium soy sauce (reduced to 1 Tbsp)
1/4 cup ume plum vinegar (reduced to 2 tsp)
(added 1 Tbsp mirin (rice wine vinegar)
(added 2 cloves garlic)
(added juice of 1 lime)
1 small white onion, quartered
2 cups plain yogurt
1/3 cup olive oil

Quinoa Croquettes:
1 cup quinoa, washed thoroughly
1 medium carrot, peeled and coarsely grated
1 small zucchini, coarsely grated
1 scallion, finely chopped
1 tsp garlic powder
1 tsp salt
6 sprigs parsely, minced
1 large egg
1/4 cup all-purpose flour
grapeseed oil

Pulse cilantro, soy sauce, vinegar, and onion in a blender or food processor until smooth. Stop the motor and add yogurt and olive oil. Blend until creamy. Transfer to a lidded container, and refrigerate for at least 1 hour. Recipe makes double the amount of sauce per serving.

Combine quinoa with 2 cups water in a small pot and bring to a boil. Lower heat, cover, and simmer for 15 minutes, until water is completely absorbed. Remove from heat and transfer to a medium bowl to cool.


When cool, add carrot, zucchini, scallion, garlic powder, salt parsley, egg, and flour. Mix well. Using your hands, form mixture into patties about 1/2-inch thick and 2 inches in diameter.

Heat oil in a large skillet over medium heat. Working in batches, lay 5 to 6 quinoa cakes in the pan, and cook for about 3 to 4 minutes. When golden, turn over and cook until the second side is golden. (Check by lifting up a side with a spatula.) Add additional oil as needed, and remove any brown bits that accumulate in the pan.

Remove cakes from pan and place on a plate lined with a clean, recycled brown paper bag. Serve hot, drizzled with Cilantro Yogurt Sauce.

Nutritional Analysis: 248 calories; 11g fat; 2g saturated fat; 38mg cholesterol; 10g protein; 30g carbohydrates; 3g fiber; 1483 mg sodium. (Revised with above changes 397 mg sodium)


Notes/Results: The quinoa croquettes were excellent--crispy on the outside and that nice little quinoa "crunch" and chewiness within. They are substantial without being heavy and paired really nicely with the yogurt sauce (with my changes of course!) ;-) I thought that the quinoa mixture seemed fairly wet and I was worried that it might not hold together but it did perfectly. I ended up with about 12 cakes total, and although they taste best hot, they reheat well. They are tasty but fairly mild in flavor, so some kind of sauce or pesto works well with them--they were also quite tasty with some leftover spinach coulis from Sunday's soup. I will make the croquettes again, but will continue to play with the sauces to top them.

Sunday, June 13, 2010

Silky Tomato Soup with Spinach Coulis: Cool & Delicious for Souper (Soup, Salad & Sammie) Sundays


Uh-oh, we are just into June and I am already breaking out the cold soups that I usually reserve for the hotter months. It's been a bit humid here, but not bad, it's just that I keep finding cold soups that sound delicious and that I want to try. This Silky Tomato Soup with Spinach Coulis is from "Jacques Pepin: Fast Food My Way"--a book full of quick and easy recipes. It's a great, healthy soup to make in the morning, chill, and then bring it out for a light lunch or starter for an easy dinner on the grill.

Pepin says, "The refreshing summer soup, a silky blend of raw tomato flavored with garlic and oil, is almost a liquid salad. It's excellent on its own, but when garnished with a simple spinach coulis, or puree, it is sublime. The spinach puree is an excellent addition to sandwiches or soups and is great as a dressing for cold poached fish or as a sauce for pasta."

Silky Summer Tomato Soup with Spinach Coulis
"Jacques Pepin: Fast Food My Way"
(Serves 4)

Tomato Soup:
3 lbs ripe tomatoes
1 sweet onion (about 4 oz), such as Vidalia, cut into 1-inch pieces
2 large garlic cloves
1/4 jalapeno pepper (or less depending on your tolerance), seeded & cut into 1/2-inch pieces
3/4 tsp salt
2 Tbsp good olive oil
1/4 tsp (or less if desired) Tabasco sauce

Spinach Coulis:
About 3 cups (loosely packed) spinach leaves
1/4 cup oil (a mixture of canola & olive oil)
1/4 tsp salt
1/4 cup water

For the tomato soup:
Cut the tomatoes into 2- to 3-inch chunks. Finely puree the tomatoes, onion, garlic, jalapeno, salt, and olive oil in a blender or food processor. Push the puree through a food mill fitted with the fine screen, then add enough Tabasco to the soup to suit your taste. (You should have about 6 cups of soup.) Refrigerate until cool.

For the spinach coulis:
Pick out and discard any damaged leaves and seal the leaves in a plastic bag. Place the bag in a microwave onion and microwave the spinach on high for 1 1/2 minutes.

Transfer the spinach to a blender. Add the oil, salt, and water and process for about 1 minute, stopping the machine once or twice to push any pieces of spinach clinging to the sides down into the mixture. When it's smooth, transfer the spinach puree to a bottle or jar, cover tightly, and refrigerate.

To serve, ladle out about 1 1/2 cups soup per person. Garnish each bowl with 1 to 2 tablespoons of spinach coulis.

Note: The spinach coulis can be made up to a week ahead and refrigerated.

Notes/Results: An easy and delicious cold soup with lots of flavor and bright color. I used some local North Shore tomatoes (about 8 total) and a sweet Maui onion for the tomato soup base and some baby spinach for the puree. The recipe said to put it through a food mill, which I don't have so I started straining the soup with a sieve, and then decided that it was processed enough in the food processor and left it un-strained to give it more texture. I served the soup with some grilled bread. This is a tasty and healthy soup, I will make it again.


Now lets take a look into the Souper Sunday kitchen and see who is here this week:

Here with a recipe that isn't a Tortilla Soup (for her best tortilla soup quest), is girlichef with Mark Bittman's Soup with Poached Eggs and Greens. girlichef says, "I was looking for a tasty...and quick!!...soup for Spring that I hadn't yet tried and had the ingredients for on-hand. This soup isn't heavy or overwhelming and it's a fabulous way to pack in those vitamins from those tender Spring greens while getting protein from perfectly poached eggs...two of my favorite things."


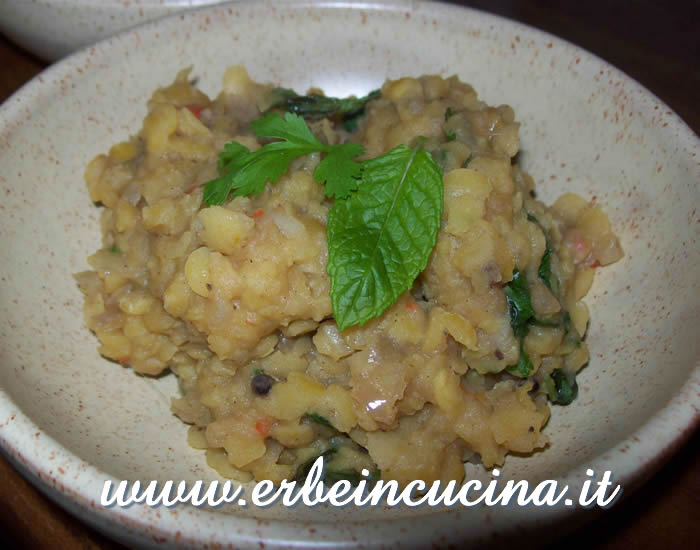
Graziana of Erbe in Cucina is back with a thick and savory vegan Toor Dal with Aromatic Herbs to share. Made with pigeon peas (toor) and lots of herbs and spices like cumin seeds, cinnamon, cardamom, ginger, cilantro and mint, Graziana served it as part of an Indian dinner.


My friend Kat from Our Adventures in Japan has been having some cold soup weather this month. She says, "The weather last Friday was so hot that I wanted something that didn't involve standing by the stove, maybe even something "cool" for dinner. I had a lot of veggies in my refridge and decided to try my hand at something new...Gazpacho." The result? Kat says, "Even if the texture was "thick", I liked this, a great way to get in a LOT of veggies and keep cool."


Kim from Stirring the Pot was cooking up a storm with Rocco DiSpirito's new cookbook and made his Cheddar Cheese and "Potato" Soup. She says, "Rocco's "potato" soup relies on cauliflower instead of potato to make a creamy, cheesy-based soup that is low calorie. Cauliflower, milk, onion, and garlic are pureed to make a hearty and thick soup. Reduced-fat cheese is added to give it a cheesy consistency. A huge bowl of this "potato" soup comes in at only 190 calories. I found that I didn't really miss the real potato in this soup. I liked this recipe and ate it for lunch most of this week."


Thick and Creamy Tomato Soup was on the menu for Zibi at Fresh Slowcooking. She says, "An easy tomato soup made with fresh Roma tomatoes and homegrown basil. No tomato peeling, no cream and no bread required. Once the soup is cooked, it needs to be puréed and garnished with a sprinkle cayenne pepper and chives. We loved it. The flavour was rich and the texture was thick and creamy. When I garnished the leftovers, I added some crumbled feta on top too and we enjoyed the soup even more. The feta adds a nice salty bite."


So nice to welcome Carla from RecipeAddict to Souper Sundays this week. Carla made a Vietnamese Beef Noodle Soup with Asian Greens and says, "I have been craving a light soup/noodle bowl for a while now. Seeing that the heat of summer has come down upon us two-fold, I didn't want a heavy, creamy soup. I saw this recipe for Vietnamese Beef-Noodle Soup with Asian Greens in the April Cooking Light Magazine and knew I had to make it. This was everything I had been craving in a light soup. I could just drink the broth straight up without even adding the beef and noodles, it was that good!"


We have Janet from The Taste Space here again this week with a Zucchini and Apple Salad with a Lemon Hazelnut Sauce (Taratorlu Kabak). Janet says, "The winner in this recipe is the lemon hazelnut sauce. It is deliciously creamy with the roasted hazelnuts ground to a thick paste with garlic, and then infused with fresh lemon juice and olive oil. It was added to baked zucchini and apples and then sprinkled with chopped hazelnuts."


Natashya from Living in the Kitchen with Puppies made a New Potato and Asparagus Salad this week and says, "This is an easy to make salad that is perfect for grill season. Wonderful new potatoes and spring asparagus in lemony union. I made it extra "grilly" (I declare this a word) by grilling the asparagus. By which I of course mean washing, trimming, oiling and seasoning and then handing off to the hubby at the fire. Hard worker, that man."


Spencer from Live2EatEat2Live is branching out into salads this week with this Ku Gua (Bitter Melon) Salad. He says, "After searching the internet, I came across this website that provided excellent direction for preparing and using raw bitter melon in a salad:I choose to use the “osmosis” method to prepare the ku gua. I didn’t use fish sauce in the dressing (just sesame oil, rice vinegar, salt, and sugar). I also did not add onions to the salad (just bitter melon and grape tomatoes)."


Christine from Fresh Local and Best made a gorgeous Pomelo Salad with Shrimp and Chicken (Goi Buoi Tom Thit) and says, "When I think of Vietnamese food, I think of fresh herbs, crisp shredded vegetables and small tender chunks of meat woven together with bright savory umami flavors. This is a salad demonstrates the versatility of Vietnamese cuisine, which incorporates citrus, carrots, jicama, shrimp and chicken among other fresh ingredients. If you can't find pomelo, pink grapefruit is an excellent substitute."


Tigerfish from Tezcape-An Escape to Food has a sandwich to share this week, this unique Otah-Egg Sandwich with Fillers of Fish and Eggs. She says, about otah (spicy fish cake cooked in banana leaves), "You can eat them straight from the banana leaves; as a side-dish to steamed rice or as a filler in your bread. Versatile, yeah? Tone down the spice by adding some hard-boiled eggs - mash Otak-Otak and Hard-Boiled Eggs to create a kid-friendly sandwich filler. Might be a good introductory way to season your kids' palates to spice."


Reeni from Cinnamon Spice & Everything Nice has taken meatballs to a new level with her Barbecue Meatball Sandwiches with Onions and Cole Slaw. Reeni says, "A homemade brown sugar barbecue sauce recipe with tender meatballs that can be made into sandwiches, eaten with buttered noodles, rice or potatoes. My favorite way of eating these is on a hard roll with cole slaw piled generously on top. The cole slaw is cold, milky and crunchy while the meatballs are warm, soft and richly-flavored. A recipe for success. They make a delicious, melt-in-your mouth combo. Finger-licking good comfort food."

There we go--some terrific dishes again this week. Mahalo to all who joined in. If you have a soup, salad, or sandwich that you would like to share, just click on the Souper Sunday logo on the side bar for all of the details.

Have a great week!

Saturday, June 12, 2010

Fresh Ginger Ale with Lemongrass: A Refreshing & Natural Simple Saturday Sipper

Thumbing through a cookbook I have had forever but never seem to cook from, "Jean-Georges: Cooking at Home with a Four Star Chef" by Jean-Georges Vongerichten and Mark Bittman, I found a recipe for a homemade ginger ale. I love the fact that it is real food and not a store-bought soda filled with artificial ingredients, and it is made with one of my favorite ingredients--lemongrass, and also a kick of chile--making it a refreshing (and a bit fiery) choice for this week's Simple Saturday Sipper.


Vongerichten says, "This is a ginger ale for grown-ups, a spicy, not-to-sweet, ultrarefreshing drink that combines fresh ginger, lemongrass, and chiles in a way you've probably never had them."


Fresh Ginger Ale with Lemongrass
"Jean-Georges: Cooking at Home with a Four-Star Chef"
(Makes about 1 quart--enough for at least 10 glasses)

1 lb fresh ginger, unpeeled and cut into small dice
2 stalks lemongrass, trimmed and roughly chopped
2 small fresh chiles, stems removed
1 1/2 cups sugar
soda water (I used seltzer water instead of club soda or tonic water as it is just carbonated water without other ingredients)
lime wedges

Combine the ginger, lemongrass, and chiles in a food processor and process until minced, stopping the machine periodically and scraping down the sides, if necessary.

Place the puree in a saucepan with the sugar and 1 quart water. Bring to a boil over high heat, then reduce the heat to medium and simmer for about 15 minutes. Turn off the heat. Cool, then strain and chill.

To serve, place about 1/4 cup of the syrup in a glass full of ice. Fill with soda water; taste and add more syrup if you like. Garnish with a lime wedge, then serve.

Note: The syrup keeps for weeks, refrigerated.


Notes/Results: Absolutely delicious! The flavors work well together and nothing overpowers. The lemongrass is wonderful with the ginger, and I used two small red chilies so it was plenty spicy, but not too spicy when diluted with the soda water. I was able to use local ginger, lemongrass and Thai bird chilies in my ginger ale. To sweeten, I used an unbleached organic sugar and next time I might try agave or honey in place of the sugar. Choosing seltzer water makes the drink even more natural as it is just carbonated water and no additives. The syrup is very refreshing with the club soda and would work well as a cocktail with vodka or rum, or even simply mixed with iced tea or lemonade for a summer treat. It would also be a fun hostess gift when presented in a nice bottle. Next time I make this I am going to add some kaffir lime leaves to the mix for an additional flavor kick. An easy and great recipe for a natural and flavorful homemade soda.

I am submitting my real food beverage to Two For Tuesdays Recipe Blog Hop Carnival--celebrating "Real Food"--or food that is natural, whole, and not loaded with artificial ingredients.

My blogging buddy girlichef is one of the 4 hosts, so you can check out her blog for all of the details and to see some of the real food dishes.

24TbadgeGIRLICHEF

Happy Saturday!

Friday, June 11, 2010

Cool, Rich & Creamy Green Tea Creams

Loving all tea and any panna cotta-like desserts, I knew as soon as I saw these lovely Green Tea Creams in Delicious Magazine, that I would have to make them. They were from a feature on cooking with teas and looked amazing. The pictures don't really do them justice--I took a few quick shots and carefully put them in a container to transport to a friend's house for dinner. They turned out creamy and delicious--sweet but not too sweet.


The magazine says, "These little creams are easy to make...and very scrumptious. I've used matcha green tea powder, which is finely ground and has the most gorgeous emerald-green color.


Green Tea Creams
Belinda Jeffery, Delicious Magazine, Volume 7 / Issue 4
(Serves 6)

600 ml (about 20 ounces) pure (thin) cream
2 tsp matcha (green tea powder)
180 g (6.35 ounces) caster sugar
pared zest of 1 lime
5 gold-strength gelatine leaves
1/2 cup (125 ml) milk
1/4 tsp vanilla extract
thick cream and shaved dark chocolate to serve

Place 2 Tbsp pure cream in a small bowl and whisk in the green powder until smooth. Pour into a large saucepan, then whisk in the sugar, lime zest and remaining cream until well combined. Gently warm over low heat, stirring for 3-5 minutes until the sugar has dissolved. Gently heat the cream for a further 2-3 minutes, without stirring, until it is just below boiling point.

Meanwhile, soak the gelatine leaves in cold water for 5 minutes to soften. Squeeze to remove excess water, then add the leaves to the hot cream mixture and stir for a further minute until gelatine has dissolved.

Remove from the heat and gently whisk in the milk and vanilla. Strain through a fine sieve into a jug, then divide among 6 small glasses or ceramic dishes (delicate Asian tea cups look lovely).

Transfer to the fridge and leave the creams to set for at least 3 hours. To serve, dollop each cup with thick cream and garnish with shaved chocolate.


Notes/Results: Creamy and very tasty, these were a perfect dessert. I wasn't exactly sure how best to convert sheet gelatin to powdered, but I found some sheets in the gourmet section of a local store so I didn't have to. I used heavy cream for the topping, and unable to find thin or light cream, I just used some heavy cream (2/3), mixed with half & half (1/3) and it seemed to work just fine. I served these in my Japanese tea cups and rather than topping them with shaved dark chocolate, I used some little variegated curls I had on hand. These were really delicious--especially if you love green tea as much as I do. I will make these again.


Happy Aloha Friday!